ANALYZING THE GOOD AND BAD OF A PROPERTY PHOTO SHOOT
Introduction
Today we’re analyzing a recently completed photoshoot of a property and will highlight what could be improved and what already looks great in the images. The goal of this blog is to give some tips and suggest things to look out for when shooting your next listing.
Starting with the exterior of the property
To give that inviting feel to the home, always keep the blinds open for the front façade shot. This shot is also the perfect example of a photographer not using their hand to cover the sun which is causing the glare on the garage and side of the house.
When using this technique, avoid covering any foliage or the house itself and then continue to take your brackets as normal. Our team of editors can then remove your hand through the Image Enhancement process, giving you that magazine-ready finish.

Shooting the back of the property
We want to ensure the potential buyer’s focus is on the space itself and in this case, the smaller items like the step ladders, equipment and plants could have been hidden around the corner ensuring they don’t draw the viewer’s attention.
Be sure to always include the whole home and roofline in your frame rather than cropping out some of the property. This allows the potential buyer to get a true understanding of the space.

Moving inside the house
We always recommend removing the stools and mirrors while shutting the open window and partially closing the blinds, where possible. As mentioned previously, we want to ensure the viewer’s focus is not distracted.
In this shot, the entire hallway could have been included in the image to highlight the size of the room and the door should have been left open to show what is behind it. Furthermore, simple things like removing the mat and power cord will help the space feel less busy, however, the fan is turned off which is a must when shooting a property.

Shooting The Kitchen
You can see in this image the photographer has tried to adjust the blinds however the angle is in the wrong direction which is less than ideal. We would also recommend removing the items on the benchtop to create a better shot. On the plus side, this is a great angle for highlighting the appliances and the abundance of storage on offer.

Shooting The Bedroom
Quickly straightening the bedding and switching the lamp on would have made all the difference in this shot. In this case, the fan is bolted to the chest of drawers so we would suggest avoiding it in the image altogether. This item is not included in the sale and is very outdated so it is not something that will appeal to a potential buyer.

Shooting The Second Bedroom
Start by turning on the lights, removing the power cords and remotes, body lotion and quickly fixing the doona cover to ensure the bed looks more presentable. By also shutting the window the photographer could have given a clearer image of the external view.
As with the previous bedroom, by adjusting the blinds you can block out any view of the neighbors and by changing the angle of the shot the photographer could have included more of the door frame and door handle.

Shooting The Living Area
It’s important to bring a sense of calm and space to the living area by removing any clutter like the dish rack, oven mitts and soap dispenser. We’d recommend removing the rug and CD racks while also pulling up that plastic on the floor. You can also see that something has been hidden on the couch however the cushions need to be better placed to hide this entirely. Further to this, the fan was either on or still moving when the image was taken which has created a visible blur.
Finally, by adjusting the angle of the shot, the photographer could have given a better idea of the space and also removed part of the object shown in the lower left of the image. We’d also suggest opening both doors towards the back of the room to give a better feel for the layout.

“There is always room for improvement when it comes to marketing your property with professional high-quality images,” Brad Filliponi
Shooting The Lounge Room
This shot has been taken from a higher angle which is likely due to the height of the couch. Again, we suggest the mirror, stools and chair be removed. The hanging keys could have been removed or tidied while the item on the window sill has the potential to draw the viewer’s eye away from the focal point.
In most cases, we want to try and minimize lines in the window ensuring a clear view for the potential buyer. By having the window open, this is actually made worse by creating extra unnecessary lines and unfortunately looks quite unappealing.

Shooting The Bathroom
It’s clear this image has been cropped as the basin has been partially removed. It’s always better to include the basin and clear the glass shelves to remove any unnecessary clutter. These items could have been simply hidden in the bottom of the bath for the shoot. Further to this, we would recommend opening the door and standing a few steps back to take the image.

Conclusion
So there you have it, that’s our analysis of a professional photoshoot and hopefully, we’ve given you some key tips to be mindful of. If you would like one of your shots analyzed, send us the link to your listing and we can provide some suggestions on how to improve your own photos and market your listing to get you and your client the best results.
RELATED ARTICLES

Did you know a few added leaves could be the secret to selling faster? Our Virtual Renovation edit adds life, warmth, and value to any property—no matter the season. Discover how a little greenery can make a big impact and help your properties stand out!
READ MORE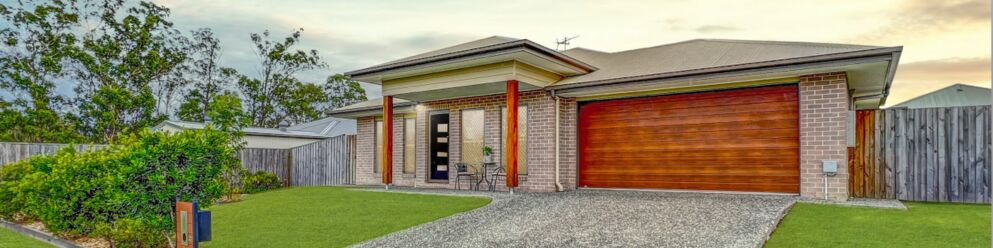
Attention to all real estate professionals who prefer the DIY approach when it comes to property photos! Check out this blog for five simple tips that you can start using today to take your real estate photography from good to amazing.
READ MORE
Explore seven essential tips to capture an impressive real estate hero shot. From perfect timing and lighting to staging and post-editing, implement these strategies to make a lasting impression on house hunters and close more deals.
READ MORE
Brad Filliponi hit the jackpot when he studied under Greg Gardner. In this fascinating post, the two industry leaders reflect upon those days gone by.
READ MORE
Taking professional photographs for virtual staging requires a different mindset than photographing furnished spaces. But it’s really not that big of a deal. If you’re new to the task of photographing empty rooms for the purpose of virtual staging, this post has some valuable pointers.
READ MORE
In this blog, we put the two latest market-leading smartphones head-to-head when it comes to real estate photography. Who will come out on top? The Apple iPhone 12 or the Samsung GS20? Check out this blog to see which smartphone we recommend when shooting your latest listing.
READ MORE