HOW TO IMPROVE YOUR REAL ESTATE PHOTOGRAPHY
Introduction
If you’re a regular reader of the BoxBrownie blog, you may be familiar with our previous article covering how to take great photos of the bedroom for your real estate listings. For a room that we spend so much time in each day, it’s amazing that it’s so often forgotten by most agents in favour of the living areas and hero shots. Hopefully, since reading our article you have been able to put some of those tips into practice and are nailing the elusive high-quality bedroom photo.
In this article, we will be focusing on the rest of the home with some of our top tips for improving your real estate photography, both on the interior and exterior of the property. To make it even easier, we have taken ten images from the one home to help highlight how to put these tips into practice.
Image One
Preparing the space for the photo is incredibly important. By simply removing any items that are likely to make the area unappealing, especially the dog accessories that you can see here, and tidying up the remaining scene by ensuring the chairs are straight and pushed in, you can instantly boost the entire feel of the shot.

Image Two
At first glance, this may look like a great photo of the front façade of the home however by not properly framing the shot, parts of the property have been cut out like the side access. Further to this, by raising the blinds on the windows you can increase the welcoming feel of the residence and allow viewers to get a sense for what it would be like to come home to this property each day.

Image Three
This one is a little more self-explanatory where the focus has been taken off the sleek and stylish kitchen and instead your eye is drawn to what is happening outside the window. In this case, the blinds could have been brought down to block out the neighbors. Remember to have a clear purpose for each photo when advertising your home and always draw the viewer’s eye to the intended focal point.

Image Four
It’s a great technique to open the door, as shown in this photo, to showcase the space on offer and the connection to the outdoors, however, by taking the shot too close to the furniture, the viewer’s eye is drawn to the couch and not the size of the room. Always remember to consider how your prospective buyer is likely to view the photo and adjust the shot to suit.

Image Five
Besides removing the items circled below, this image could be significantly improved by adjusting the height of the shot to eye level. This will help to give a better sense of the scale of the area itself. Also, by including the door in the shot, the photo can have more context and it can be used to better frame the room.

Image Six
Let’s start with the positives, the tapware is nice and straight which helps bring order and a sense of calm to the photo. Unfortunately, the shower haze is quite distracting and there is very little that can be done about this as it’s not something that can be digitally removed. Without being able to clearly see what is behind the screen, the editor won’t be able to remove the haze and provide an accurate representation of the space.

Image Seven
Showcasing the backyard effectively is a great way to give a potential buyer an idea of what it would be like to live in a property. Choosing the right angle for your backyard photos is very important to ensure you can capture the entire area and give a good idea of the space on offer.

Image Eight
As we have mentioned, adjusting the blinds can change the entire feel of a photo and would help remove the line of sight into the neighboring property. This shot would also benefit if it was angled further to the right, allowing the image to include more of the dining area and ensuring the room feels more spacious and inviting while also taking the focus away from the couch itself.

Image Nine
As with most things, we have a short window of time to grab a potential buyer’s attention and by simply removing the cot and any smaller items from the bedside table, you can instantly make the image less cluttered. Presentation is everything when marketing a property so it’s also worth taking a few moments to straighten the pillows and, again, by simply adjusting the blinds you can help take the focus away from the neighbors and make the bedroom feel more private.

Image Ten
Whether you’re wanting to appeal to a family or those who love to entertain, the dining area is an incredibly important space to showcase and it has been entirely missed when shooting this property. Further to this, by taking the time to straighten the frames (marked here), you can ensure the viewer’s eye is not being drawn away from the main focal point of the photo which in this case should be the spacious open-plan layout and connection to the alfresco area.

Conclusion
Hopefully, by using all the images taken from the one property, we have been able to give you an understanding of some of the key elements to be looking out for throughout the entire home. And remember, for your next photo shoot, the more photos the better. You can always choose your preferred images in the editing stage whereas sometimes going back to the property and taking more photos simply isn’t an option. By capturing these photos effectively, we can go a long way to showcasing all the most desirable features of the property while still giving potential buyers a good understanding of the feel and layout of the home.
RELATED ARTICLES

Want more Airbnb bookings without breaking the bank? Our latest video reveals how to capture stunning listing photos using just your phone and create professional floor plans. With expert tips from Brad, marketing your Airbnb is now easier than ever.
READ MORE
Great photos drive bookings in the short-stay rental market. Discover how The Holiday Home Girls help owners style properties, capture standout images, and use SnapSnapSnap with BoxBrownie.com to create polished, booking-ready listing photos.
READ MORE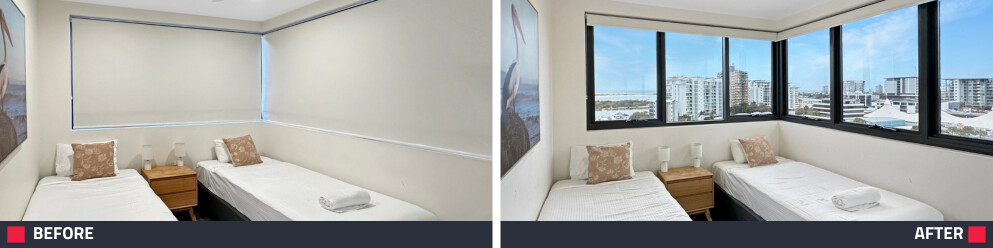
Master the simple decision that can transform your listing photos. Learn when to open blinds to maximize natural light and when to adjust them to minimize distractions, helping you create bright, focused images that attract more buyers.
READ MORE
Discover how Ryan Shields replaced slow, expensive photography workflows with SnapSnapSnap and BoxBrownie.com, achieving faster turnaround times, lower costs, and consistently polished listing photos.
READ MORE
When property listings fail to convert buyers, it is not always price or presentation. It is clarity. Buyers need to instantly understand how the space actually works. Floor plans are key to attracting more qualified buyers and renters. Learn how they make a difference.
READ MORE
Elevate your listings in our free SnapSnapSnap webinar! Learn to capture stunning property photos using your iPhone, master simple staging tips, and explore our exclusive 4-week bootcamp to boost your photography skills and transform your marketing.
READ MORE