TAKING THE BEST PHOTOS WITH A NIKON D7100/D7200 CAMERA
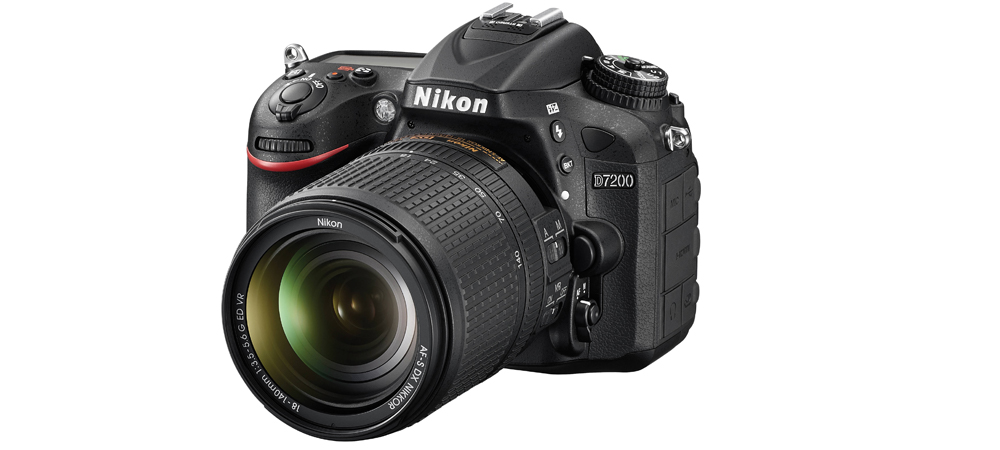
Not all cameras are created equal, and nearly all of them are designed for different purposes, be it happy snaps or wildlife photography. After years of working in real estate photography, BoxBrownie.com Director and Photographer Brad Filliponi, found that Nikon’s DSLR camera was one of the best and easiest to use.
Nikon has a great range of DSLR Cameras aimed at amateurs with professional body internals, all with the automatic HDR function. The Nikon D7100 or D7200 camera provides the best set up that’s easy for anyone to use, especially when used with the 10-24mm Nikon DX lens.
HDR bracketing is essential for magazine quality photos, but most cameras on the market only do three brackets which aren’t enough for capturing the detail required for real estate photography. The great thing about the Nikon D7100/D7200 camera is its automatic bracketing setting which produces five brackets rather than the standard three.
The following information is a detailed step-by-step process for setting up your Nikon D7100/D7200 camera to automatically take five HDR bracketed shots.
Nikon D700/D7200 Camera Settings to Get You Started
The following settings can be set and left on your camera, they will make shooting any real estate interior or exterior photos a breeze.
* For accessing settings refer to your cameras manual for guidance.
Set your Nikon camera as follows:
- ISO 100 (film speed) – keep it at its lowest for best results.
- White Balance – WB auto
- Camera menu B1 (Custom shooting menu on rear camera LCD) - ISO sensitivity step value 1/3
- Camera menu B2 – EV steps for exposure control 1/3
- Camera menu C2 – Standby timer 6 seconds
- Camera menu E1 – Flash sync speed 1/320
- Camera menu E2 – Flash shutter speed, 30 seconds (this is very important to change)
- Flash control for built-in flash – TTL
- Modeling flash – ON
- Auto bracketing set – AE and flash
- Bracketing order – MTR, under, over
- Exposure metering (focus) – Matrix setting
- JPEG setting – This affects image quality and JPEG size.
Small is good to shoot in if you are using BoxBrownie.com to edit your photos, as they are good for online marketing, signboards and standard newspaper ads.
- Small and medium - good for signboards/small real estate flyers
- Large - good for billboards/newspaper covers - Focus point setting – Single point AF-S Focus priority.
This allows you to focus on any area in the scene to get the sharpest shot possible, all by rotating the black square on the target focus point.
Use the main command dial to select the focus point. Select the different settings using the camera thumb wheel and hold the “focus -mode” selector switch. Tip: Ensure S is also selected using the front camera scroll wheel to confirm the setting. - Autofocus A1 (Camera back menu setting) – AF-C priority selection, focus
- Autofocus A2 (Camera back menu setting) – AF-S priority selection, focus
- Single-point AF – Auto
Tip: Half press shutter to “focus” on your subject, once focused, move your side autofocus switch to “M”, then press the shutter release button to shoot your five HDR brackets and take the photo. Your camera won’t focus every time a photo is taken between the five HDR image brackets, potentially ruining the sequence focus. It will keep all your photos looking their sharpest when blended during the editing process.
Interior and Exterior Camera Settings for your Nikon D7100/D7200 Camera
When shooting real estate interiors and exterior, set the following camera settings and leave them. This will guarantee your HDR brackets will be perfect every time when submitting them to BoxBrownie.com for final editing. If the settings are correct your Nikon camera should shoot five HDR bracket shots, at the push of a button.
Tip: If you don’t have a Nikon camera, shoot in “M” manual setting or “HDR” bracketing setting, and ensure you take a range of shots in this format. The more consistent photo information you have, the better the end editing result will be. Capturing five HDR bracketed images is the best for creating one well-blended photo.
Nikon D700/D7200 HDR Bracketing Settings
The following settings are all you need to shoot your property using HDR bracketing. It is important to review your brackets to ensure there is enough photo information available before moving onto your next shot:
- Turn camera on
- Self-timer is set to on – 4-6 seconds, delay 2 seconds, number of shots 1
Set the interval between shots two seconds or lower.
The self-timer is located on the top left of the camera body, underneath the circle toggle button, the black button needs to be pushed in to turn the dial. - Press the +/- exposure compensation button (RHS near on/off) so +0.3 is showing.
Check brackets when the shot is complete, to see if the interior sequence looks bright enough. You need to see the view outside the window as well. If you can’t you will need to compensate and take a second HDR. We recommend +1.7 = +2.3 +/-. - The left side of the camera, press the BKT button and toggle RHS switches to read “5F 2.0”.
Adjust the numbers using the toggle wheels on the front and rear of the camera.
We recommend the following settings:
- Flash sync speed – 1/320
- Flash shutter speed – 30 seconds
- Flash ctrl for built-in flash – TTL
- Modeling flash – On
- Auto bracketing set – AE and flash
- Bracketing order – MTR, under, over - Top left circle on camera – Click the dial to the A position = Aperture priority
- Refer to the green dial screen – RHS top of the camera body. Rotate switch near on/off button so the Aperture F-stop is on 7.1, 8, 9, 10 or 11 for the best results.
F7.1 or 9 is the best as the images are taken quicker, which is best for dusk shots, so the shutter isn’t open for a long period of time, allowing you to take more images.
Tip: If you want the “star” look from lighting on your interior images, it is best to use F22 in low-light to create this. It is important to be aware that your camera will be reading information for a longer period, so make sure you have steady feet and enough time to take the shot.
Tips For Shooting Interiors
When shooting, ensure you only zoom out to 12mm (on cropped sensor cameras). If you’re using a full-frame setup we recommend shooting interiors around 16-18mm for the most realistic results, any wider then this and it will warp/stretch the shot making the area look bigger than it is.
Only use a 10mm zoom if you want the area to look larger or you need to shoot a tight space. The end goal is to show off as much of the room as you can in the one frame, without making the room look bigger then it is.
Shooting and Editing Tip
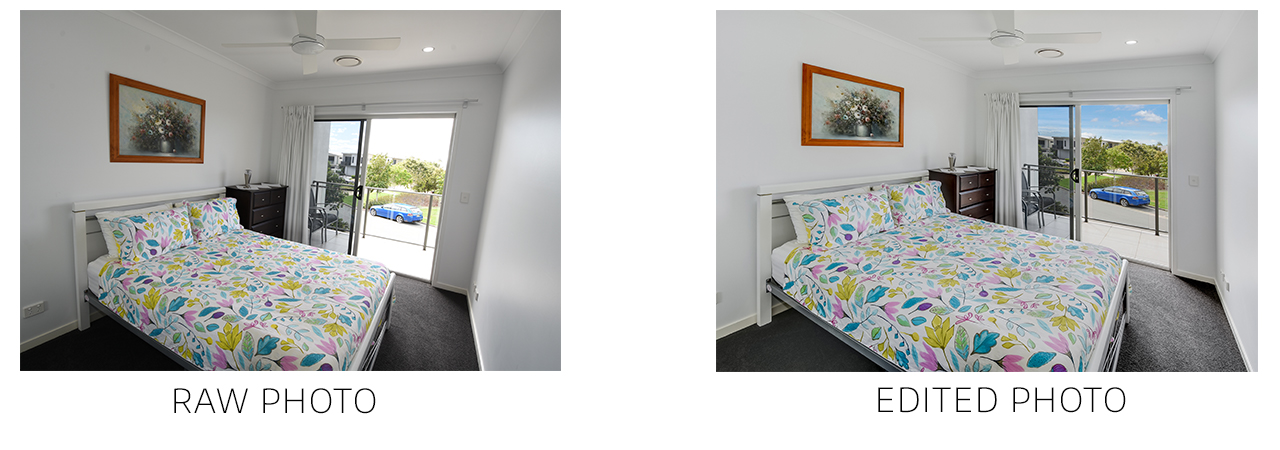
Always leave a little extra area on the side of your images for vertical straightening. This happens in the editing process when BoxBrownie.com amend the distortion to vertical walls from wide angle lenses, minor cropping will occur. All professional photos have straight walls, keep this in mind on-site and stand further back when taking the photo.
HDR Shooting Tip
Always review your bracketed shots before moving onto the next room. Sometimes when shooting high contrast areas, you may require more than five brackets, taking more brackets is always better than not enough.
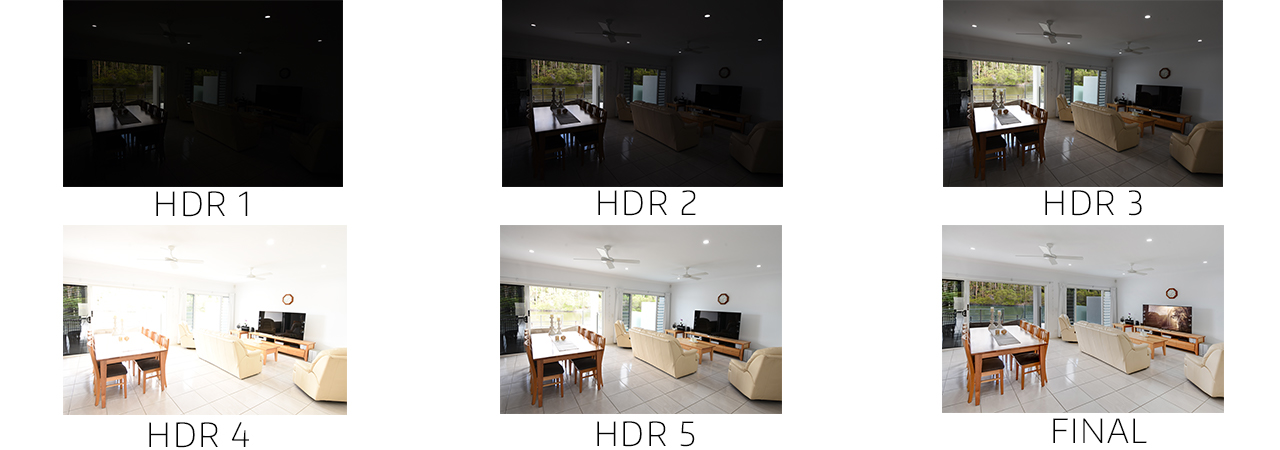
To increase your light range you’ll need to adjust your Exposure Compensation settings, and bump the brackets up to at least +1.7 so you can cover more light range. Alternatively, you can bring it back to approximately -1.7 or more to capture high contact interior/exterior scenes due to heavy sunlight and darker shade areas. Always keep in mind that you need lots of detail outside of windows when shooting inside a room. Below is an example of a well-bracketed room.
With this Nikon set up taking HDR bracketed images are easy. If your camera doesn’t have the automatic bracketing setting you’ll need to shoot in “M” manual mode and bracket the shots individually, and check you have each light area covered in your photos.
Following this, all you need to do is simply group the images in the BoxBrownie.com Dashboard when uploading them in the HDR Bracketed image editing option. We’ll then take care of the rest to return a clear and high-quality image.
Nikon D700/D7200 Single Photo Settings For Lifestyle Shots
Single shot settings should only be used for moving subjects and lifestyle photos with moving surroundings (eg. People and cars). Lifestyle photos are popular in real estate, the easiest way to capture these is to switch to the automatic single shot photo function. The HDR bracketing function should never be used for moving objects, as they will appear blurry in the final editing process.
Tip: If you’re taking lifestyle shots or landscapes with moving objects, we recommend changing the camera setting so only a single shot is taken. Switch over to (A) automatic function and turn off the HDR setting holding the button down on the left side of the camera, toggle the right thumb wheel so the AE and Flash setting are reading “F2.0”.
It is a great add-on to include photos of local attractions close to a listing, it helps buyers visualize living in the area. The following are settings to use only when taking single shots, where there are potentially moving subjects in the scene.
- Self-timer off and dial to S
- BKT of 2.0
- Simply keep it in auto or program mode for any moving shots.
Alternatively, keep in A (Aperture priority mode) and bump down the aperture to the lowest setting of F4.5 and focus on the subject you’re shooting for the lest camera movement.
Nikon Flash SB-500 and SB-5000 Settings For Real Estate Photos
Being able to use your camera flash effectively will help to achieve the best real estate photos, especially for internal shots. The following are flash setting that you should be using for all interior photos:
- Switch on
- TTL BL FP setting (C-1 Flash M)
- +/- to be set on -3.0EV for interior and exterior brackets
- Keep the Built-in Wide Panel open
- Use plastic flash hood (Diffusion Dome) to soften the flash on interiors
- Bounce the flash off the roof, do this by tilting the head to light up any darker foreground areas.
* For accessing settings refer to the flash manual for guidance.
Why use a flash on the HDR bracketing image capture process?
By using the flash on the lowest setting enables it to “fill-in” shadowed areas in your photo, this can be used for any situation for both internal and external shots.
Tip: Ensure you use your flash diffusion dome on top of the flash, and remember to open the wide panel located on top of the flash.
The only time you should not be using a flash is in highly reflective places, such as bathrooms and kitchens, this is to reduce reflections. It is always best to use your discretion and maybe shoot some photos with a flash and without.
Reading your HDR Bracketed Images
Your Nikon camera will now be set up to automatically take five continuous images, all at different light speeds, but you still need to know how to read your images.
It is always important to review your photos on-site to know that you have captured enough information in your shot, this will ensure our editing team has enough information to process photos to their full potential. If you’re unsure if you’ve captured enough information, take a few extra brackets it is always better to have too many images to work from then not enough.
Here is what your five bracketed images should look like:
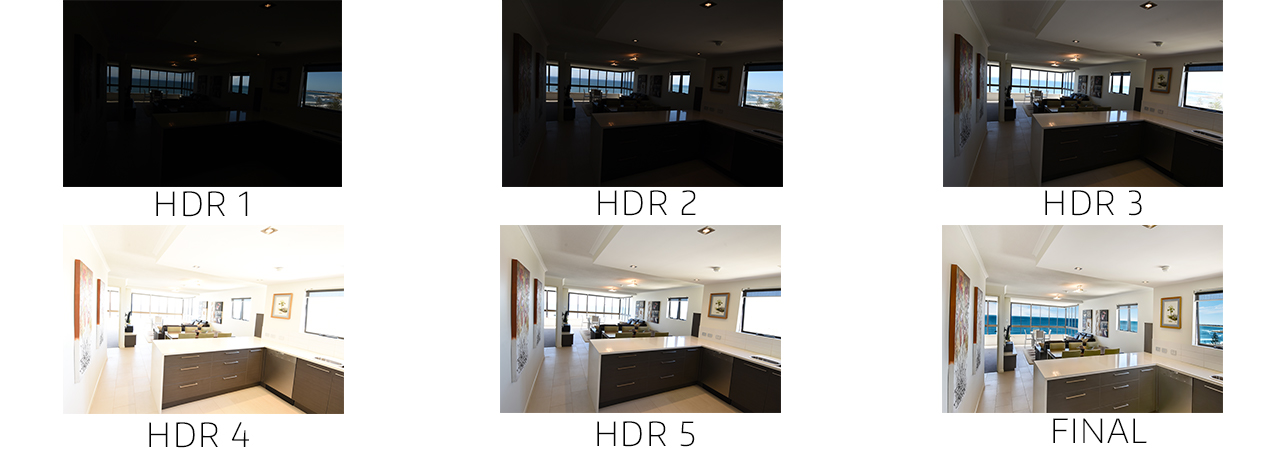
- HDR 1 - Outside is the clearest part of the image, the indoor area is nearly completely dark and barely visible.
- HDR 2 - The outdoor area is a bit clearer, but indoor areas are quite dark.
- HDR 3 - Dark shadows appear, this is the kind of exposure level you get from using standard camera settings.
- HDR 4 & 5 - The shot is overexposed, including the walls. Everything should appear too bright, but you’re capturing key details in the dark areas.
- Final - This is the final image after editing. All the images have been blended together to create a well-balanced photo where you can see the details inside the house and also the view outside.
HDR Bracketing is a photographic technique used by all the best photographers. It used to be a technique that only the most skilled knew how to do, but with Nikons automatic bracketing setting, you can now have professional photos at the click of the button. With the help of BoxBrownie.com you also don’t need to spend hours editing your photos, as we do the editing for you. To see just how easy taking photos using this set up is check out our blog 'Using a DSLR camera for Real Estate Photography'.
With HDR bracketing and BoxBrownie.com’s specific Image Enhancement with HDR Bracketed Images editing option, you’ll have professional photos in just 24 hours!